Tuesday, 25 September 2012

Sky Sports Cupcakes

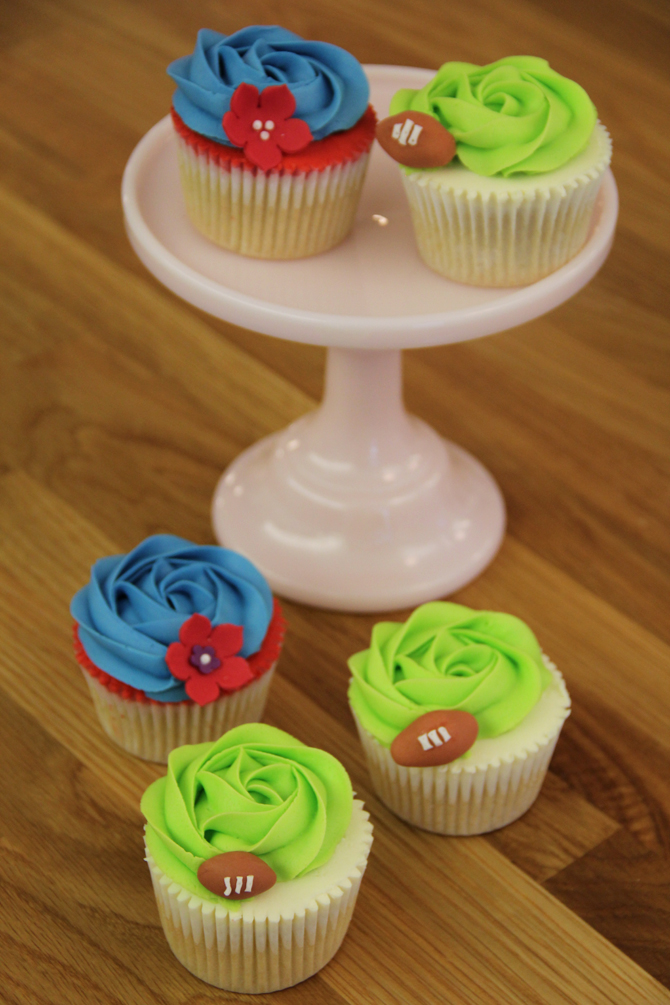
Americolor Electric Green rose swirls 
I’ve spent the last few months telling my boyfriend, with a promising look on my face, that I would bake some cupcakes for his work. After listening to myself consistently repeat the same sentence “I’ll make them tomorrow!” I knew it was time to stop procrastinating and start being a girlfriend that sticks to her word, it’s difficult, I must say. Luckily the time came around (with great luck) that I had a few spares baked up at work for the pirates and mermaids class, and since the class finished on time I had just enough time to get creative and still manage to leave the workshop at 6!

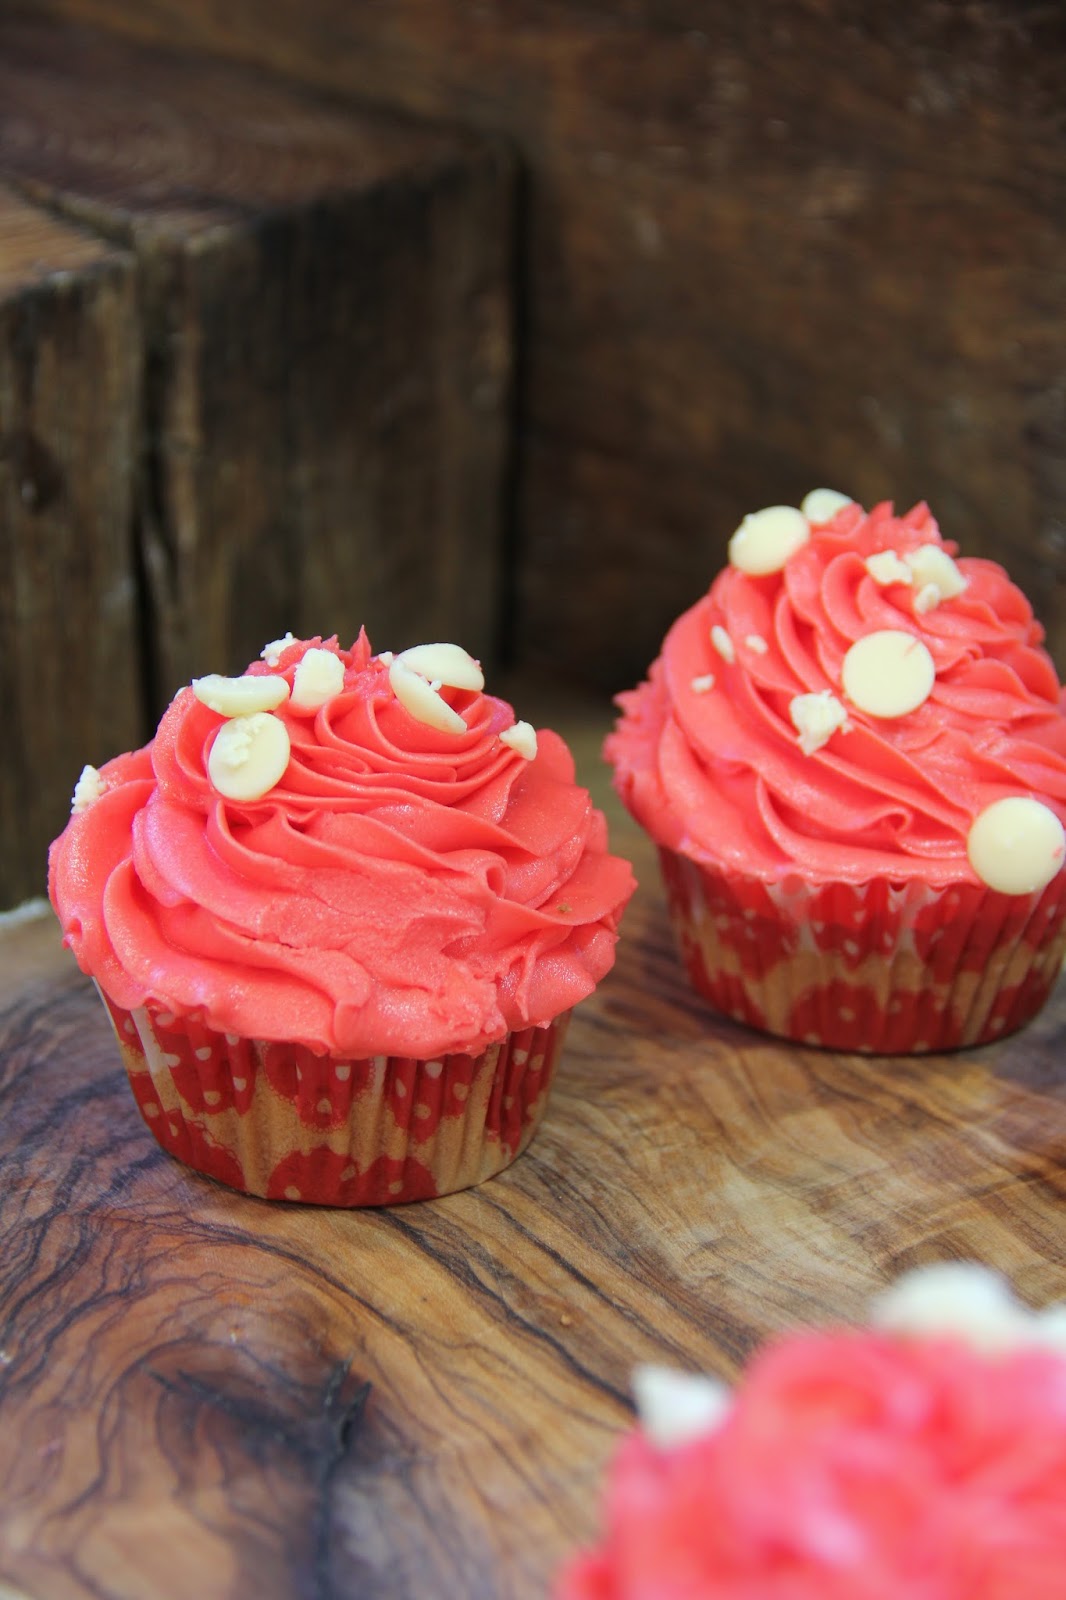
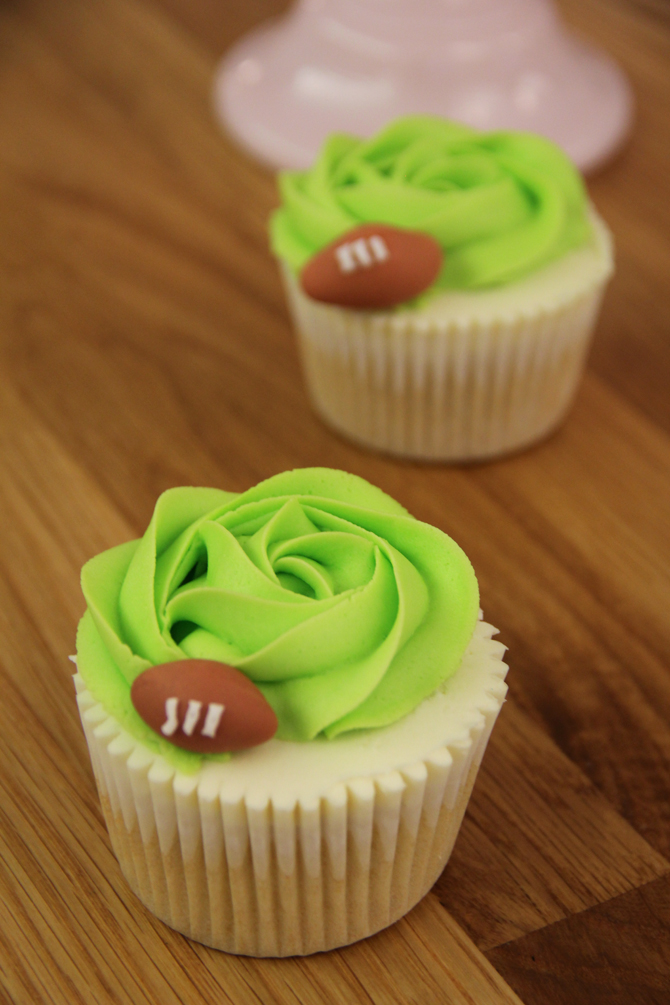
The most annoying thing about these cupcakes was deciding on decoration. Russell works for Sky Sports, so this meant something green and sporty, along with the clashing combination of red and blue? Yum. My fondant modelling skills are painfully dire, and I ended up moulding what I thought were rugby balls, but it turns out, they’re actually American footballs. This is the perfect misunderstanding of sports, considering Sky Sports doesn’t cover American football, so my modelling work was pretty much pointless.  Oh well, the cupcakes were still well received which in vanilla essence, is all that matters.
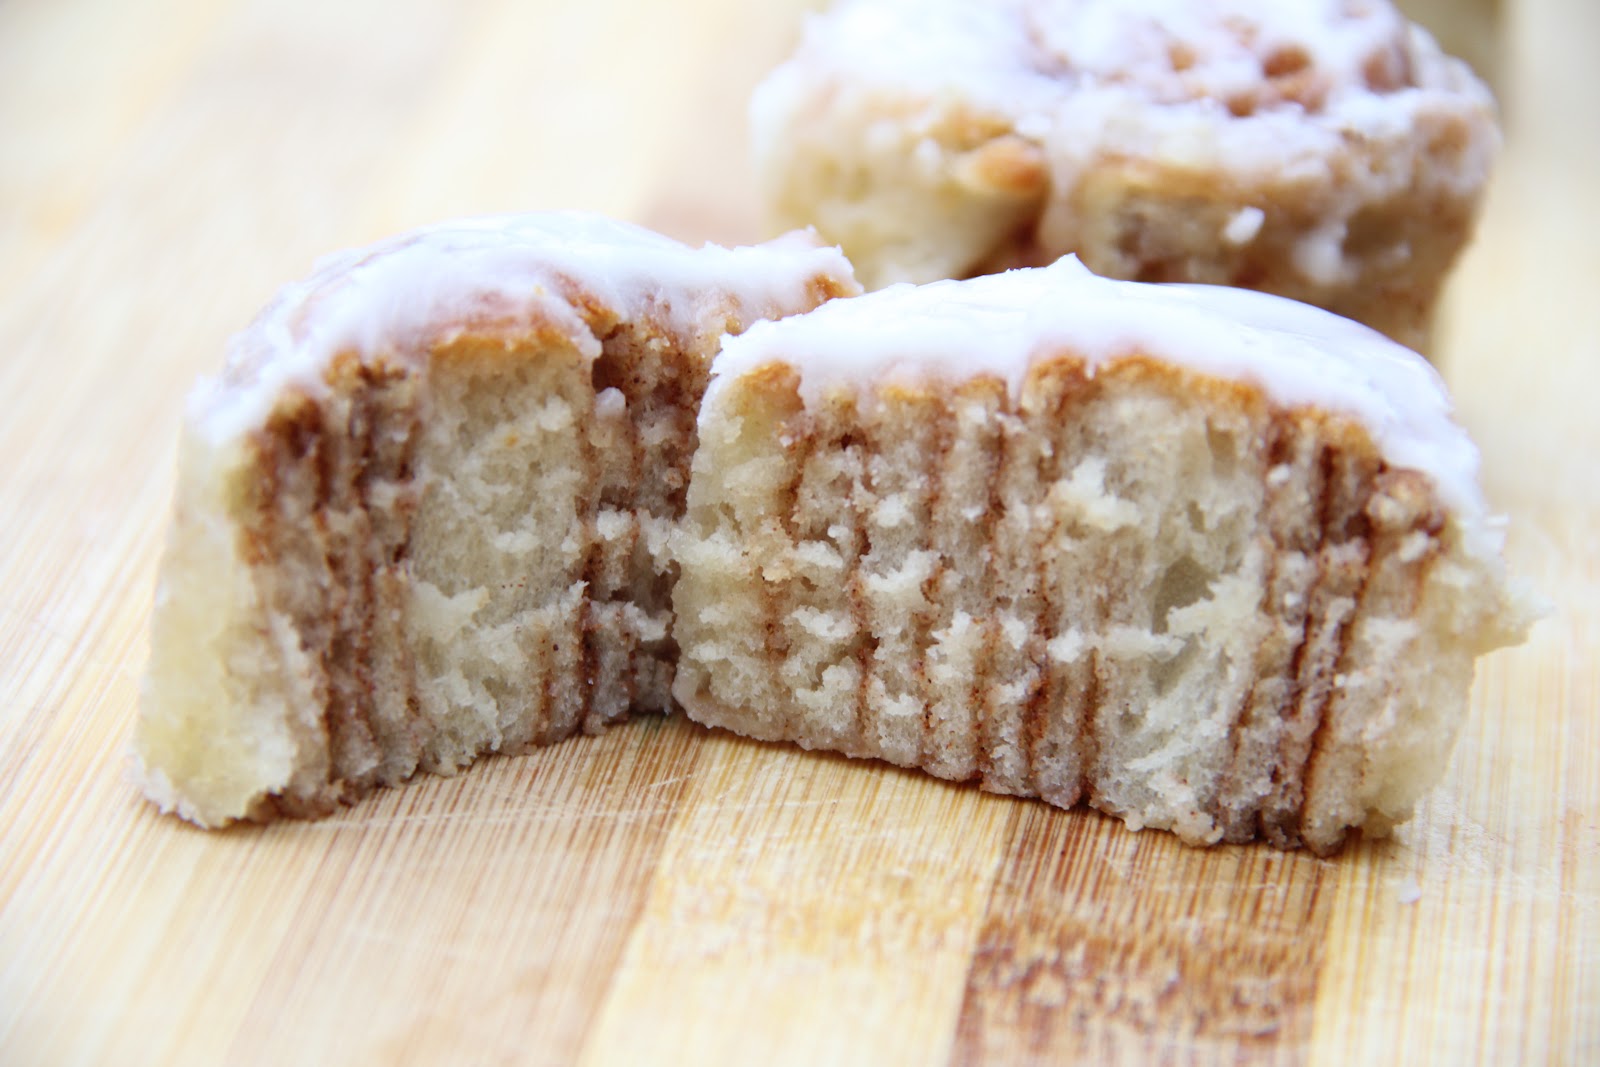
The recipe used for these cupcakes can be found in the Vanilla Cupcakes post, or if you cant be bothered to go all the way over there - just think to yourself, 3 eggs, 1 cup flour, half cup sugar, 1 tsp of vanilla and BP and voila. 
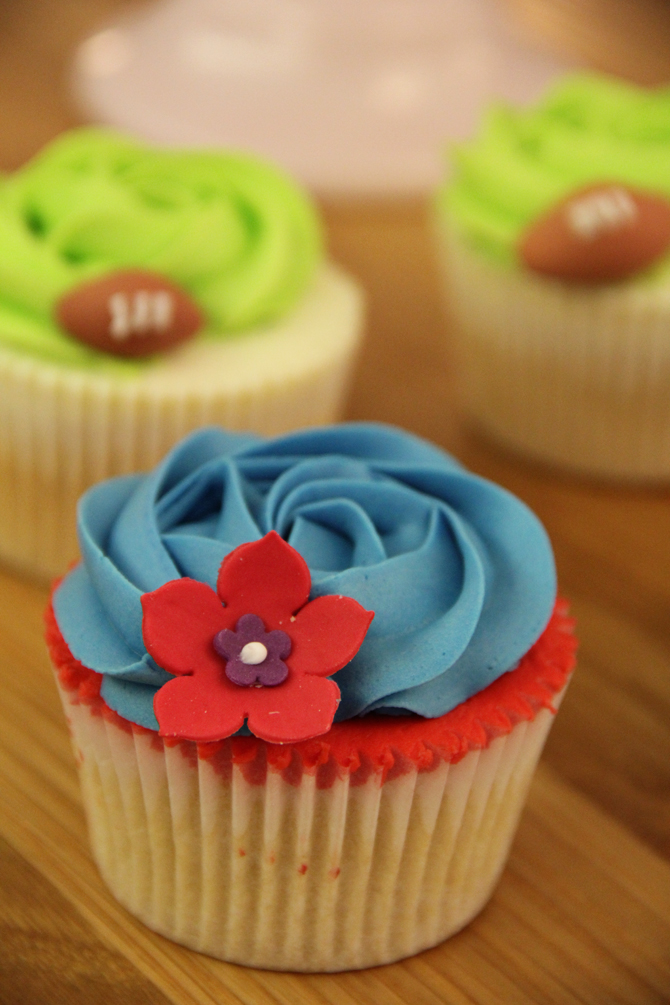
Sky Sports Cupcakes - Americolor Red Red & Navy Blue 
For the buttercream, I used Americolor Electric Green for the sporty cupcakes. For the more flowery counterpart; I used an Americolor Red Red for the flat tops, teamed with an Americolor Navy Blue.
Love Em xx

Monday, 24 September 2012

Cake & Bake Show 2012

Mary Berry demonstrating chocolate cake alongside Paul Hollywood - Cake & Bake Demonstration
This weekend has been all about baking, I write this as if every weekend isn’t about baking, well, in all embarrassing honesty - 70% of my weekends revolve around baking. But this weekend I had the treasurable honour of assisting a brilliant pirates & mermaids cupcake class, making cakes for my boyfriend’s work colleagues (pictures to follow) AND AND AND attending the Cake and Bake Show! A weekend of 100% baking, wouldn’t you say?

As I’m sure many of you baking Brits were aware, this weekend saw the UK’s first ever baking exhibition! But it weren’t like one of those wedding shows you get at the event halls in a big shopping complex where another name you might have for it is an  inside market. Oh no, it was much more than that, not only was there an inside market of some proper groovy sprinkles, props, embossing rolling pins, fabulous books… but ticket holders also got to enjoy cake demonstrations by the likes of Mary Bezza & Paul Hollywood! Queues (literally) of people were taught (from a-far) how to bake the perfect bread, chocolate cake, roulade… the list was endless, as was the sheer amount of people at the event. The fact that so many people booked tickets to C&B really showed the vast increase in budding bakers out there in big (small) old England, it showed that thousands of people have reverted back to simple home traditions that over time and advances, we slowly started to forget about. So what if the queues to eat were an hour long? My hunger was cured by each and every stall, demonstration, classroom and edible visitors book (near the life-size chair - what were you doing there?) I laid my eyes on.

Sponsored by Baking Mad, held at Earls Court (and Manchester) and roughly 20 hours of cake and bake. I have no qualms that there will be another show next year, the year after that and possibly the ten years after that. Next year however, the show will no doubt be much much bigger, because if it's not then I don’t think there will be a show the following year, unless ‘Bring your own packed lunch’ is stated on the tickets and some other stuff too.

Here’s what I got up to in pictures… 
Tempting Cake's gorgeous sweets display
Crumbs&Doilies cupcake tower
Sausage Roll cake by BSGUK
Peggy Porschen brought her parlour to the show!
Gingercups retro cupcakes
Baker & Maker sold tons of gorgeous bits and bobs! 
Kate Shirazi sold her book selection along with aprons!
Fish and chips cake - cake and bake show competition 
Betty Crocker masterclass
Piece of cake anyone? C&B
So there you have it! If you went, what did you think? I'd love to know your thoughts!
Love Em xx

Friday, 21 September 2012

Caramel, Pecan & Chocolate Bars

The start of university is approaching and I’m beginning to get a solid case of writers block, and it shows no sign of leaving. The irony of course, is in the hilarious fact that I study Journalism. Of course, there had to be a sudden incapability in one of the areas that is most important to my academic career, OF COURSE. One of the things reading various books/watching American sit com (I’m rearing towards Sex and the City) has taught me is that writer’s block doesn’t just happen out of nowhere, something must have caused it - a life event, something on your mind, nothing on your mind, being incredibly lazy… jack pot. That’s it. That’s why I have no motivation to cook up something (barely) interesting in my head and write about it online! Because I’m lazy, or have just spent too much time doing lazy stuff like having depressing thoughts about growing old or life as we know it.  I guess this means I am kind of  looking forward to the start-up of uni, but only because it will give me an excuse to drink two large cappuccinos every day.

Back to baking; who know you could learn a life lesson from baking? I baked these bars out of boredom (because I was being lazy) and the caramel layer crystallised (how actually awful). So, here's a lesson to anyone out there…don’t be lazy. 

The Recipe:
Adapted from Lakolands Chocolate n Pecan Bars
Base:
2 cups plain flour
1 cup packed light brown sugar
Half cup butter, softened (120g)
1 packet pecans
Caramel:
1 cup packed light brown sugar
2x 2/3 cup (150g) un/salted butter
1 cup chocolate chips
The Method:
  • Preheat the oven to 180C, in a freestanding mixer combine all of the base ingredients, except pecans, and mix until a fine crumb forms.
  • Grab a 13/9 inch square tin and using your hands, press the crumbs into the base of the pan. 
  • Evenly place the pecans on top of the crumbs. 
  • In a large bottomed saucepan, heat the sugar and butter for the caramel on a medium heat. Stir constantly. Once the mixture begins to boil, keep stirring for a further minute. 
  • Take off the heat and pour the caramel over the base.
  • Place in the oven for 18 minutes. Do not over-bake!
  • Immediately pour the chocolate chips on top  and use a knife to swirl them around.
  • Leave to cool completely before digging in! 
Love Em xx

Tuesday, 18 September 2012

Miette Double Chocolate Cupcakes

What's a chocolate sponge without real chocolate? That devil’s food cake boil-the-water stuff just isn't enough for me! I need (let’s be honest - (but only in cowardly brackets) want) the real deal, organic/fairtrade/100% cacoa that derives from cocoa beans sourced from bohemian, tropical dessert islands… who am I kidding? A whole cup of the cocoa I used for these cupcakes came from Hershey’s cocoa that was on special offer at ASDA. But in this cakey instance, it mattered not because the great thing about this recipe is that it uses a near similar amount of flour and cocoa, so it was always going to taste of something that could be likened to chocolate. Also, have you ever noticed that most chocolate cake recipes only call for about half a cup of cocoa? Miette chucks in plenty of the chocolate stuff, which raised the recipe potential quite significantly and TRUST me, Miette really takes chocolate cake to another level with this recipe. It was so dense and there was no spongy after taste, just sweet and strong scents of sexy chocolate coming through from each and every bite. What more could you want?

Miette Double Chocolate Cupcakes
Makes 18 double chocolate cupcakes (buttercream in the recipe)
1 1/2 cups plain flour
1 1/4 cups unsweetened cocoa powder
1 1/2 tsp baking soda
1/2 tsp baking powder
3/4 tsp salt
2 and a quarter cups caster sugar
56g 70% chocolate
1 cup boiling water
1 cup buttermilk
1/2 tsp vanilla extract
2 large eggs, at room temperature
1/2 cup vegetable oil
 Miette Double Chocolate Cupcakes
  • Line two cupcake trays and  preheat the oven to 180C.
  • Put the chocolate in a heatproof measuring jug and pour the boiling water over it. Whisk until the chocolate is melted. Let the mixture cool for 15 minutes.
  • Sift together the flour, cocoa powder, baking soda, baking powder, and salt into a bowl and set aside.
  • In a separate jug, whisk together the buttermilk and vanilla. Set aside.
  • Whisk the eggs on high speed until foamy, about 2 minutes. Reduce the speed to low and slowly pour in the oil, whisking until combined. Raise the speed to medium and whisk until fully incorporated, about 30 seconds longer.
  • Reduce the speed and slowly pour the cooled chocolate mixture into the egg mixture. Slowly pour in the buttermilk and vanilla mixture. 
  • Add the sugar and whisk until the batter is smooth and liquid, about 2 minutes.
  • Stop the mixer. Remove the bowl and add the sifted dry ingredients and fold it in by hand until just incorporated. Now whiz the mix with the whisk attachment for ten seconds. 
  • Pour the batter through a sieve into a bowl to remove any lumps. Press against the solids in the sieve with a spatula to push through as much batter as possible.
  • With an ice cream scoop, plop the batter exactly two thirds into the liners - no more than that ( i made this mistake). 
  • Bake until the tops spring back, 23 minutes.
  • Transfer to wire racks and let cool in the pans. 
  • Meanwhile, make the frosting by whipping the butter (100g) and cream cheese(200g) together till combined. 
  • Slowly add the icing sugar (500g), then the lemon juice(1tsp). Beat for 2 minutes till pale in colour.
  • Pipe with your favourite nozzle!
Last but not least, if you're not able to attend the Cake & Bake Show this weekend at Earls Court, be sure to watch this space next week to see exactly what went down at the event, I'm so excited!
Love Em xx

Tuesday, 11 September 2012

Red Velvet Cheesecake Brownies

I have a confession to make. I doubled the below recipe and the second batch of brownies (without the cheesy top) ended in an un crispy, dry, burgundy disaster! I'm sure, if I hadn't of doubled this innocent,  sweet and delicious (never done anything to upset me) recipe, then all would have ended in chocolatey bliss. But what really interested me is that the cheesecake topping had moistened the burgundy brownie substantially, which added a nice little touch to the better batch of the two!

All of you don't happen to be wondering wondering why I made these. So I made these this week because apart from working, I've spent quite a bit of time at home, on the Internet, browsing....admiring everything on foodgawker. And why have I spent more time then usual doing this, which subsequently caused me to make a horrendous batch of brownies? Cos I can no longer drive. That's why. And it's absolutely killing me. On the plus side, it means you get to see more on mbakes! Woo!

Anyway, must dash, work experience at Goodtoknow starts tomorrow. Still got to pluck my eyebrows and wax my tash! Wish me luck!
The Recipe:
Brownie:
Quarter cup cocoa powder (60 ml)
3 large eggs at room temp
170g unsalted butter
200g caster sugar
180g plain flour
150g dark chocolate (60%)
1 tsp vanilla extract
2 tbsp red food colouring
Cheesecake
300g cream cheese
2 egg yolks at room temp
2 tsp vanilla extract

The Method:
  • Line one 8 inch square tin with parchment paper and preheat the oven to 180 degrees celsius. 
  • In a saucepan, melt the butter on a low heat then add the chocolate. Keep stirring until all of the chocolate has melted. 
  • Take the mixture off the heat and whisk in the cocoa powder until smooth. At this point you can either transfer the mix into a freestanding mixer or leave it be. 
  • Add one egg at a time, consistently mixing. Then the vanilla, sugar and lastly the flour. Add the food colouring last. Mix till well combined. 
  • Plop all of the brownie batter into the prepared tin and spread around well. Set aside. 
  • Make the cheesecake layer with an electric whisk or mixer. Cream the cream cheese till smooth and add the egg yolks one at a time. Lastly the vanilla - add to your preference. 
  • Gently smooth the mixture on top of the settled brownie using an offset (cranked) spatula.
  • Bake for 40 minutes or until the cheesecake topping is a healthy golden brown. 
  • When it's baked, leave to cool in the tin so it keeps it's shape.
  • Enjoy and refrigerate when not in use!

PS. Sorry for all of the painfully similar pictures! Budding awful photographer over here!
Love Em x

Thursday, 6 September 2012

Raspberry and Apple Crumble

Here's a right comforting one! So comforting in fact, that you dont even have to use scales or cups in the baking process. This is perfect for those days when you're feeling under the weather, just throw a few simple ingredients together and voila! Like today for example, I woke up with a contracted cold/flu type onus from the boy sleeping beside me. What better way is there for him to make it up to me than taking me to Sainsbury's and letting me spend over five minutes choosing the perfect fruit for this crumble. I suppose he is kind of forgiven. 

But seeing as the deed is done, and there is no escaping these aches and pains, I might as well try and not moan and eat this crumble instead. There is one reason why that is the better option, shall I tell you what it is? Well it's not very interesting BUT if you happen to have a cold, molding raspberries and apples together create quite a sour combination, so with each bite you get a strong dose of flavour (tasting much is quite unlikely with this type of death threatening virus, you see). Meaning that that's one less thing you have to moan about when you've got a minor flu! Hooray! 
The Recipe:
A little tip! You don't need to use these exact measurement when baking any crumble, it is simply a matter of preference. Do you like yours salty or sweet? The sugar is yours to decide!

1 packet (200g) of raspberries
1 whole cooking apple, cubed 
150g caster sugar
250g plain flour
100g unsalted butter, cold and cubed

The Method:
  • Preheat the oven to 180 degrees Celsius. Refrain from washing your choice of fruit as they easily pick up moisture and you wont have a solid crumble. Unless of course, you want a juicy mess. 
  • Peel the apple, chop up into 3 cm cubes and place in a 7/8 inch dish along with the raspberries and then, mix together. 
  • Mix in two tablespoons of the sugar till everything is evenly mixed and starting to change colour. 
  • Set aside so that the filling can infuse its flavours. 
  • Pour the flour into a medium sized bowl , along with the cubes of butter. 
  • Now time to get messy; with the tips of your fingers start rubbing the butter into the flour until you have course breadcrumbs. I like to leave large clumps of  butter in the breadcrumbs for full kicks of flavour every now and then.
  • Lastly, stir in the rest of the sugar with a spoon. 
  • Pour over the fruit, let the crumble get into all of the crevices. 
  • Pop in the oven for 25 minutes to brown and crisp up. 
  • Serve with single cream!
Love Em x

Absolutely Starving!

With work experience at Goodtoknow starting next week, and this beautiful coffee shop/independent supermarket/bakery/patisserie/salad bar AND carvery place opposite London Bridge train station just standing there inviting us all in with its gorgeous cake display and wondrous wooden interior - it would be rude not to pop in every morning before making my way over to Great Suffolk Street round the corner, right? Right. 
And this place, despite being directly opposite London Dungeon's - really isn't that easy to spot. Absolutely Starving! is located inside a walkway on the very side of the road in London Bridge - perfect location! But with ugly stone blocks blocking its beauty - brilliant. 
But still, if you have an eye for discreetly scrumptious food dens, this one is out of this world. To list, so far I've only tried their roast chicken baguette, cappuccino and triple chocolate brownie but that is more than enough to make me want to spew pretty words at this place. 
Sit back and drool over some of the traditional snacks they sell, maybe it'll be enough to convince you to look behind that ugly stone wall...
UA-34919951-1
Pear Tart - Absolutely Starving!
Double chocolate brownies from Abstarv
Lemon Cake Slice - Absolutely Starving
Love Em x

Tuesday, 4 September 2012

My Summer in Food

Arabic Lipton tea/Cappuccino/Eggs benedict/IKEA meatballs & mash/Freshly brewed coffee at boyfriends/midnight Lotus biccy's at boyfriends/midnight B&J's at boyfriends/chocolate & salted caramel Pinkberry with every chocolate topping/Peggy Porschen's red velvet & chocolate cupcakes
Do you know what the best thing about this laborious English summer weather is? If you want to you can make it feel like Christmas all year round, isn't that bloody fabulous? Every day for example, I wake up and think "It's Christmas weather, therefore I am happy" You get to translate all of that cloudy doom and gloom into festive cheer, and the best part about it is (for us Britons that is) - its all year round! 
You might be reading this and thinking, what the hell is she talking about? Why does she think it's always Christmas? Well... I don't, obviously. But I do LOVE christmas AND winter weather (winter clothes more than anything), so for me, when I wake up in the morning and its mid July and I'm having to squeeze into my waist 28 Topshop jeans (the ones that don't actually fit me but refuse to believe it) as opposed to a skimpy H&M dress, I am happy, cosy and warm and this is perfect because there is nothing better than not having a sweaty bum when sitting on public transport. I guess it's that link between warm clothes and Christmas that make me think about it every single day. Oh, and also the festive baking creations that have already started to pop up on Pintrest.
So to round off the summer, as we ease into a chilly September, have a look at what I ate during those summer months in Limbo. 
PS. You may or may not have noticed but I've yet to jump on the dieting bandwagon, maybe a 2013 new years resolution....? 

London painting/boyfriends photography/London 2012
Love Em x

Monday, 3 September 2012

Best Cinnamon Buns

Blogging is now a post Sunday thing for me and subsequently, baking has also become a Sunday must-do in the Hassan household. We all like to get together,and this one was definitely a team effort. My favourite part of the team baking had to be when making the icing for the rolls. Best friend Shannon was whisking away when best mum Zehra said "that look's like something I've seen before' - I put it down to menopausal hormones. Drizzling it over the bun with a fork afterwards was literally the icing on the metaphorical bun.

More appropriately, I always dreaded the thought of baking buns or rolls or bread type balls, in my head I mentally put it in the same category as puff pastry - a place no amateur should go! But these were simple.Time consuming-ly simple! My favourite part in the baking was gently shoving my hand into the warm proved dough - a fetish I and probably loads of you out there can proudly admit!

I had two go's at the bun making, as the recipe makes approximately a life time supply of buns, I made one batch yesterday afternoon and one today. Texture wise, the refrigerated dough was more dough-y.

Now onto taste (this deserves its own little paragraph), completely and utterly irresistibly deliciously unbelievably the best homemade cinnamon roll I have EVER tasted. Don't let the fact that this was my first homemade C.Roll put you off, either. I've still tried tons of them, and I will gladly give anyone £500 who doesn't agree with me. Any genuine takers?
Shannon admiring the Cinnamon Roll icing
Recipe adapted from The Pioneer Woman Cinnamon Roll 101 
For the Dough:
1 cup caster sugar
1 pint whole milk
1 cup vegetable oil
9 cups plain flour flour 
1 heaped tsp baking powder
1 tsp bicarbonate of soda
1 tsp salt
14g active dry yeast (2 packs)
For the Filling:
1 jar of ground cinnamon (optional amount)
2 cups sugar (optional amount)
Loads of melted butter/220g (optional amount)
For the Icing:
500g icing sugar
100ml+ whole milk
1 tsp vanilla extract (optional)
WARNING: makes A LOT of rolls! 

The Method:
  • Start by preparing yourself for the mind blowing taste experience that's about to happen and then get a deep saucepan and fill it with milk, oil and sugar.
  • Heat the saucepan on medium, until the mixture has just reached boiling point and then remove off heat and set aside until it is luke-warm. 
  • Sprinkle all of the yeast on top of the lukewarm mixture and leave to do its thing for just 1 minute. 
  • After that, plop in 8 cups of the flour, the bicarb, baking P and salt and mix till well incorporated. 
  • Cover with a clean paper towel and leave to prove for at least 1 hour. The dough will keep for a couple of days.
  • Once the dough has proved, take half of it and place on a clean surface. With flour at hand, begin to roll into a large, thin rectangular shape. Now is also the right time to preheat the oven to 204 degrees C.
  • Take your melted butter and smooth all over the rolled dough till there are no surfaces left to cover. 
  • Now sprinkle a cup of the sugar all over the butter (the extra cup is for the other half of the dough).
  • Now sprinkle sprinkle sprinkle on that cinnamon until it looks like a brown carpet. 
  • Take the long end of the dough and start to tightly roll the dough towards or away from you, roll gently until you have something that looks like an off white snake. 
  • Take a sharp knife and cut each roll one inch thick. 
  • Place in greased foil trays or a large greased tin and squidge the rolls closely together. 
  • Bake for 16/17 minutes. Whilst baking, prepare the icing by whisking milk into the icing sugar until you reach a desired consistency, 2 tablespoons usually does the trick.
  • Take the rolls out of the oven and drizzle on the icing with the end of your whisk whilst the rolls are still warm. Take a look at the photo methods below for extra inspiration!
Cinnamon Roll Method

So there you have it, one last thing - do people like the methodical photographs? They might be a permanent thing!
Template by Pink + Lola